Activities Register

|
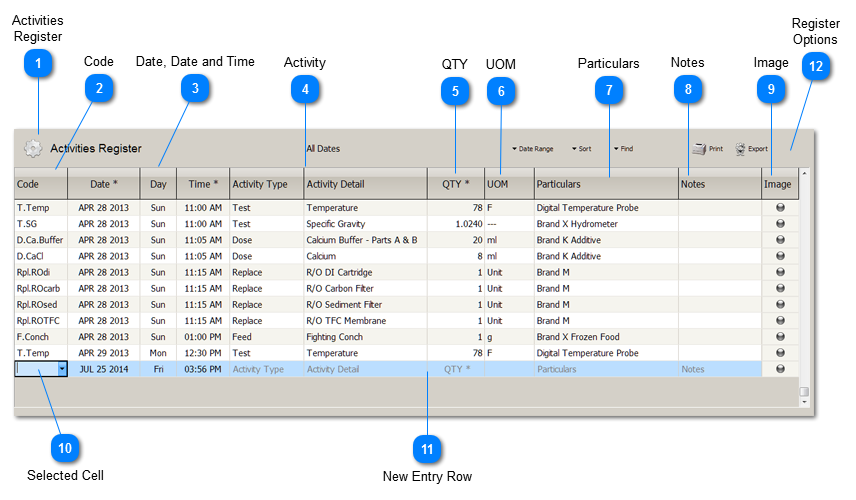
The center of BlueChromis is the Activities Register. The Activities Register is an electronic journal of everything you do with your aquarium, from measurements to cleaning filters. Each row is one entry in the Register.
The Activities Register is specifically designed to make recording Activities as easy as possible. Features such as Memorized Activities, Autocomplete, and the Keyboard Spinner make recording Activities convenient and fast.
The Activities Register also monitors the Minimum and Maximum values allowed for measurements. If you record a value that is out of the acceptable range you set for that measurement, the register will display a message in the Message Bar to let you know.
Once your Activities are recorded in the Activities Register, you can use Tabular Analysis to see your Activities in an easy to review columnar format. Also, Chart can help you visualize trends and relationships, and see if your water values are within acceptable ranges.
|

Column Type: Dynamic Autocomplete
The short Code used to autofill an entire row with a Memorized Activity.
If you type a new short Code when entering an Activity, BlueChromis memorizes information about that Activity and stores it in the Memorized Activities List. When you recall a Memorized Activity by typing its Code, the Activity Type, Activity Detail, QTY, and Particulars are all autofilled. You can then save the row immediately, or you can edit any of the columns.
If you make changes to the autofilled row, the Memorized Activity will be updated with those changes. To prevent changes to a Memorized Activity you can lock it. See Memorized Activities List.
Memorized Activities, along with the Keyboard Spinner, make entering repetitive tasks incredibly easy. Type the Code for an Activity, then tab out of the cell. The entire row will autofill. Then tap a Spinner key, if necessary, in the QTY column to change the value. You're done. It's that easy.
The Code column has autocomplete, so most of the time you don't even have to enter the whole short Code!
You can edit or delete Memorized Activities by opening the Memorized Activities List window. To open the window, click the Memorized button on the BlueChromis toolbar, or select Memorized Activities from the Tools menu.
Note: The Example Aquarium uses a period for a separator in the short code. You may, or may not, like using separators. Separators can make the short Codes more readable. However, the disadvantage is often having to type the separator, which adds an extra keystroke. It's a matter of personal preference.
|

Column Types: Date, Calculated, Time
The Date, Day, and Time columns are filled automatically when you create a new Register entry.
The quickest way to change a Date or Time is to use the Keyboard Spinner. When the cursor is in a Date or Time cell, simply press the plus (+) or minus (-) keys . If you hold down these Spinner keys, values will spin very fast.
For the fastest ways to enter Dates and Times manually see See Appendix B - Date and Time Shortcuts.
|

Column Types: Dynamic Autocomplete
The Activity for this entry, consisting of the Activity Type and Activity Detail from the Activity Definition.
Note: If you type an Activity (Activity Type / Activity Detail combination) that does not exist, BlueChromis will assume you are creating a new Activity. A message will display informing you that a new Activity Definition will be created, if the row is saved. The message is displayed in case you are inadvertently creating a new Activity because you accidentally misspelled a word.
 |

Column Type: Numeric
The quantity for the Activity.
A quick way to change a quantity is to use the Keyboard Spinner. When the cursor is in the QTY cell, simply press the plus (+) or minus (-) keys . If you hold down these Spinner keys, values will spin very fast. See Keyboard Spinner.
TIP: It's good practice to always enter a QTY value for all Activities. This will allow you to see every type of Activity in Tabular Analysis and Chart.
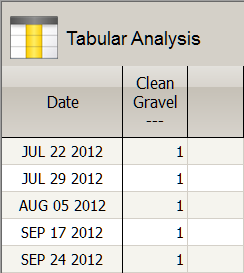
For example, if you wanted to easily see the frequency of Clean Gravel in Tabular Analysis, always give the Activity Clean Gravel a value. See image below. If you had left the QTY column blank, you would not be able to see when the Gravel was cleaned because the column would be blank, too. Instead, you would have to sort the Activities Register and view it there. It would normally more helpful to see it in the Tabular Analysis. That way you can view several Activities at once. That is, you could view all the Clean type Activities to get a quick overview of what you recently cleaned, and when.
 |

Column Type: Calculated Column
The unit of measure defined for this Activity. It is automatically entered based on the Activity Definition.
|

Column Type: Dynamic Autocomplete
The Particulars of an Activity are simply additional detail information that you can associate with a specific Activity you have recorded.
See also Particulars List.
|

Column Type: Multiline Text
Use the Notes column to add comments or record observations. Notes columns are expandable.
|

Column Type: Button cell with LED indicator.
Clicking the Image Button, or pressing the SPACE BAR when the Image Button cell is the Selected, opens the Image Viewer. To close the Image Viewer, press the Viewer Toolbar Button.
The Image Button has an LED indicator. When the LED Indicator is lit, it means there is an image available for viewing. This is a visual cue that is useful when the Viewer is closed.
|
|
The currently Selected Cell. Normally this is the cell that you are editing. The Selected Cell always has a heavy black border.
If there are cell options, a button will display when you enter or select the cell. A button with an arrow indicates a cell with Autocomplete.
|

Register Options are available from buttons located at the top of the Register form.
|
